Installing Arch Linux: a guide
20 Aug 2021

This installation guide is based on the principle you know at least a few about Linux (basic system knowledge, using a terminal environment). Arch Linux is not a Linux distro intended for everyone to use (no desktop environment by default). It is, however, a great way to learn more about Linux.
Creating bootable media
In order to install Arch, we will first need to create a media with which we'll boot our computer.
- Download Arch Linux disk image here (ISO file, no need to get the latest version, it's a rolling release and everything will be downloaded at install).
- Use the
lsblkcommand in a Linux terminal to identify your media. Executelsblkwithout your media connected, then connect it and re-run the command, it will be easier to identify your media this way.
me : ~ $ lsblk
NAME   MAJ:MIN RM   SIZE RO TYPE MOUNTPOINT
sda      8:0    0 111.8G  0 disk
├─sda1   8:1    0   511M  0 part /boot
└─sda2   8:2    0 111.3G  0 part /
sdb      8:16   0 931.5G  0 disk
└─sdb1   8:17   0 931.5G  0 part /mnt/data
me : ~ $ lsblk
NAME   MAJ:MIN RM   SIZE RO TYPE MOUNTPOINT
sda      8:0    0 111.8G  0 disk
├─sda1   8:1    0   511M  0 part /boot
└─sda2   8:2    0 111.3G  0 part /
sdb      8:16   0 931.5G  0 disk
└─sdb1   8:17   0 931.5G  0 part /mnt/data
sdc      8:32   1   7.5G  0 disk -- this is our media!
└─sdc1   8:33   1   7.5G  0 part
- We'll then need to copy the ISO image on the media.
It's a block copy, which means your media will be formatted.
From your download folder,
dd if=archlinux-2019.10.01-x86_64.iso of=/dev/sdcreplacingsdcwith your media identifier. - Start your computer from the so created media. You may need to select it in a boot menu or from the BIOS/UEFI.
Installing Arch
Arch boots up a live system to a prompt root@archiso ~ #.
First thing, if you're not using qwerty, you can load another layout: example with azerty: loadkeys fr.
Then, we need to check we are connected to the Internet: ping archlinux.org.
To use a WiFi network, we can use the wifi-menu utility.
Format drive
Now, we'll need to format our computer's hard drive.
Use lsblk to idendify it.
You may use the disk size to find it in the list (as an example, my computer has a 128G SSD, I can use this information to find the corresponding media).
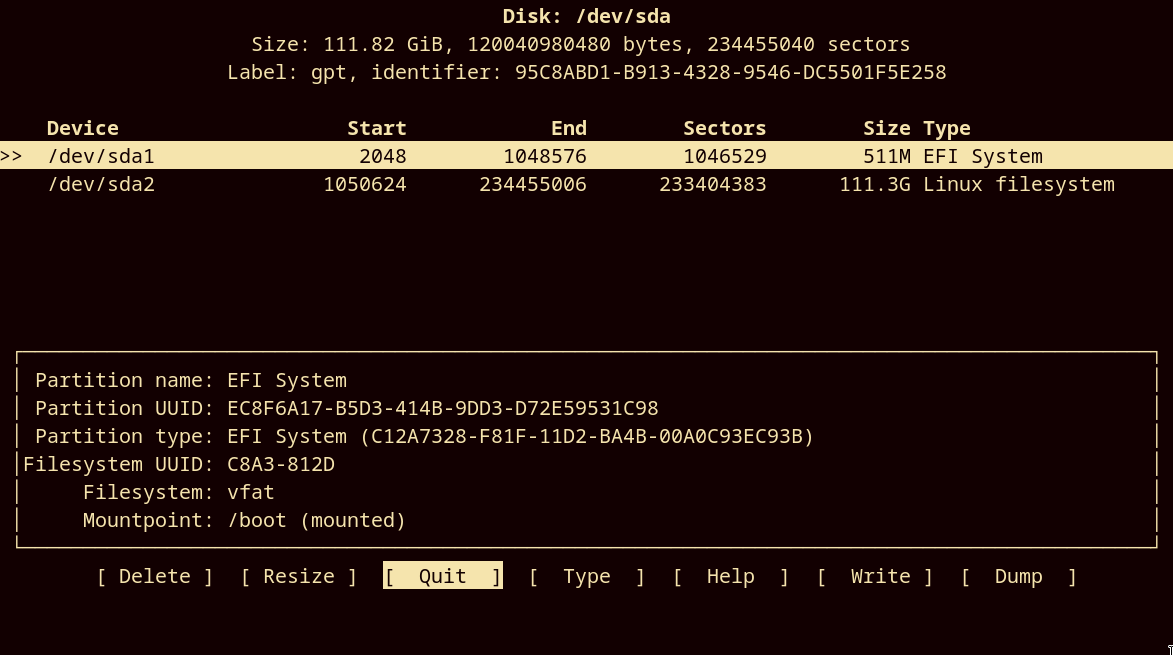
To format it, use the cfdisk utility: cfdisk /dev/sdx with sdx being your disk identifier.
Remove everything (with the “[Delete]“ button), at the end we need to have only “Free Space”.
Then, create two partitions (“[New]“):
- One of EFI type, of 500M. It must be the first one you create. It will be the boot partition, required by the UEFI system.
- One of Linux Filesystem type, with the remaining space. It will be the Linux partition (you might want to create a /home and a swap partition too, but I'll not cover this here).
Write changes to the disk (“[Write]“), it will erase all existing data on the disk.

Partitions are created, now we need to format them.
Get their id with lsblk, it must be sdxy, with sdx being the same as earlier.
- EFI partition of 500M can use vfat:
mkfs.vfat /dev/sdx1. - Linux partition can use ext4:
mkfs.ext4 /dev/sdx2.
Mount the partitions
We'll now mount the created partitions on the live system.
First, the Linux partition on /mnt: mount /dev/sdx2 /mnt.
Then, the UEFI partition on /boot of the Linux partition: mkdir /mnt/boot, mount /dev/sdx1 /mnt/boot.
This way, we get the required configuration to install Arch!
Launch the installation
It's pretty easy, just a command to run!
pacstrap -i /mnt archlinux-keyring base base-devel linux-lts linux-firmware vim
It will prompt you a few choices, just hit Return on your keyboard, default options are great.
Configuring the system
Create the fstab file (it tells the system how to mount disks at startup): genfstab -U -p /mnt >> /mnt/etc/fstab.
Then, chroot in the new system (we will now work from the disk): arch-chroot /mnt.
First, we'll set the system locale (the language).
Edit /etc/locale.gen (with vim, for example): uncomment the locales you want to use (en_US.UTF-8 in my case).
Then run locale-gen and echo LANG=en_US.UTF-8 >> /etc/locale.conf.
Configure the local time: ln -sf /usr/share/zoneinfo/Europe/Paris /etc/localtime (for Paris time zone).
Give a name to your machine: echo chosen_name > /etc/hostname.
Basic network configuration to bind “localhost” to 127.0.0.1: edit /etc/hosts to add the line 127.0.0.1 localhost.
And some programs to ease network configuration later: pacman -S networkmanager && systemctl enable NetworkManager.
Installing the bootloader
The bootloader will allow us to start our system. Currently, if you stop your computer, you won't be able to start the new Arch system.
bootctl install
Then, create the bootloader configuration.
Edit /boot/loader/entries/arch.conf (create it, if non-existent):
title Arch Linux
linux /vmlinuz-linux
initrd /initramfs-linux.img
options root=PARTUID=<uid> rw
Two things you need to know about this configuration:
/vmlinux-linuxand/initramfs-linux.imgrefers to files that must exist in/boot.<uid>must be the Linux partition UID, get it by runningblkid.
In /boot/loader/loader.conf:
default arch
timeout 5
Users
You may want to set a root password: passwd.
Then, add your main user: useradd -m -g users -G wheel -s /bin/bash username.
And give it a password: passwd username.
We can - and it's recommended - allow members of group “wheel” (which our user is part of) to use root privileges with the sudo command.
To do so: EDITOR=vim visudo, and uncomment the line containing %wheel ALL=(ALL) ALL.
Reboot
exit to leave the chroot environment.
umount -R /mnt to unmount the two partitions.
reboot
And voilà!